Creating a Discord.JS Bot
By: Jonah Uellenberg
Discord is a social platform for people all around the world to build communities around their common interests. Like many social platforms, discord can be enhanced with bots—little automations that can do anything from increasing your productivity to playing music for you, and even playing mini-games inside of discord. The possibilities for a discord bot are nearly endless.
So, how do we make one?
Setting Up Our Bot
Discord.JS
The first step is to write a program that connects to discord. We'll do that using a library called discord.js.
Before we go any further, I'd like to give a quick reminder about how Cratecode works to anyone reading this. If you haven't already, signing up to Cratecode gives you access to writing and running your code in-browser. That means you can create your discord bot and follow this tutorial in the same window. If you still aren't signed up, you can keep reading, but you'll have to write your code somewhere other than Cratecode.
Now, where were we? discord.js is a JavaScript library that lets us connect to discord. To use it, run pnpm add discord.js in the console (or npm i discord.js, your pick). Now that we have discord.js installed, we can start using it.
A Simple Discord Bot
Now, open up or create a file called index.js. If you're creating your bot on Cratecode, you can click the folder icon to your left, then double-click on index.js. Now, we have to connect it to discord. Here's an example piece of code that you can use to do that.
If you try to run this code, you might notice a glaring issue: BOT_TOKEN isn't defined. We need credentials (think username and password) to log in to discord. Before we can get our BOT_TOKEN, we need to talk about how to secure it.
.env Files
One common practice is to store "secrets" (like passwords) in a file called .env. Then, if we want to send our code to someone else, we can simply send it without the .env file, and our secrets our same. In order to do this, we need to do three things. First, we'll install a library called dotenv, which works with .env. files. You can do this by typing pnpm add dotenv into your console. Next, we need to tell dotenv to load our .env file. You can do this by adding require("dotenv).config(); to the very top of your index.js file. Now, all that's left is to create a .env file and add secrets to it.
Creating a Bot Account
To connect to discord, we need a bot account. It's similar to your discord account, but it has a little "Bot" badge next to it and can be used as a discord bot. To create a bot account, you first need to do it. Here's how:
-
Go to the Discord Developer Portal.
-
Press the
New Applicationbutton.
-
Give your bot a name and press the
Createbutton. I'll call mineCounter Bot, but you can call yours anything.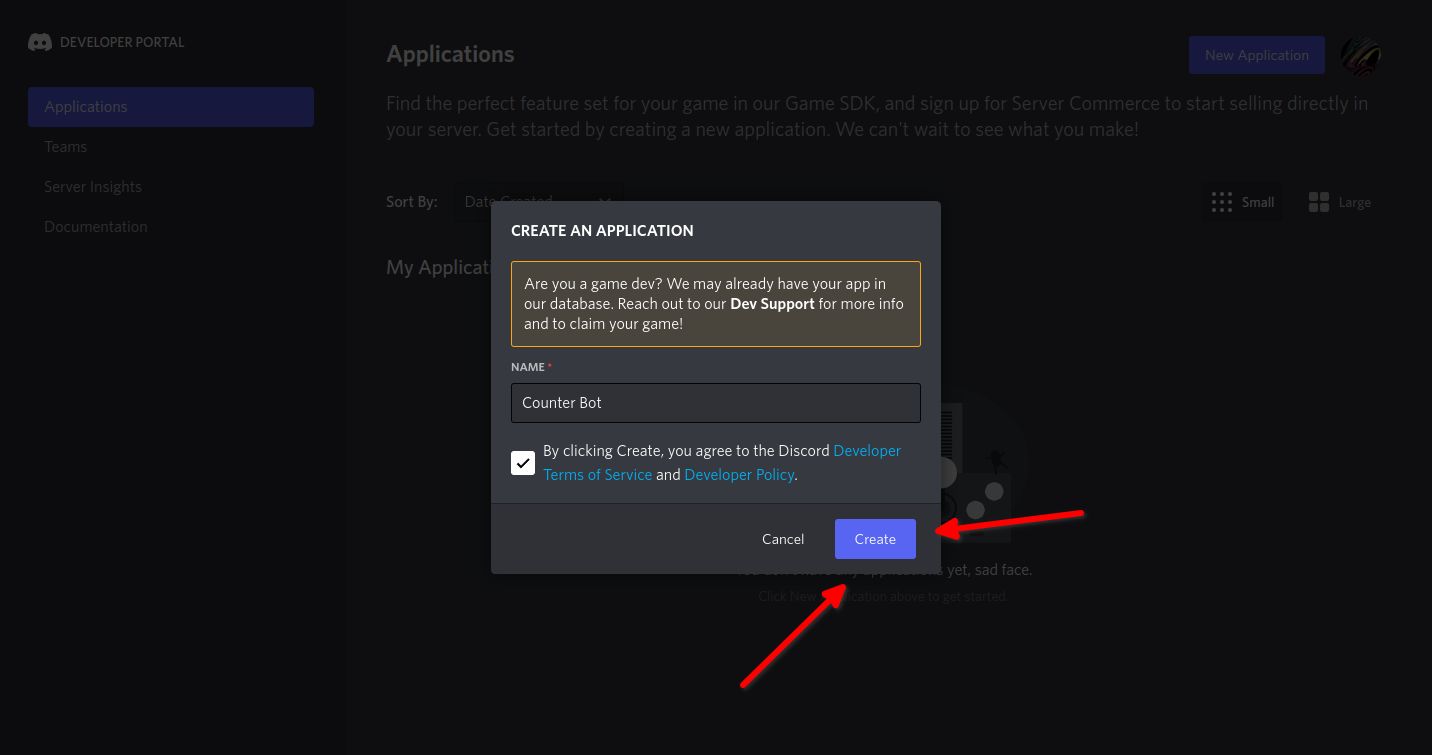
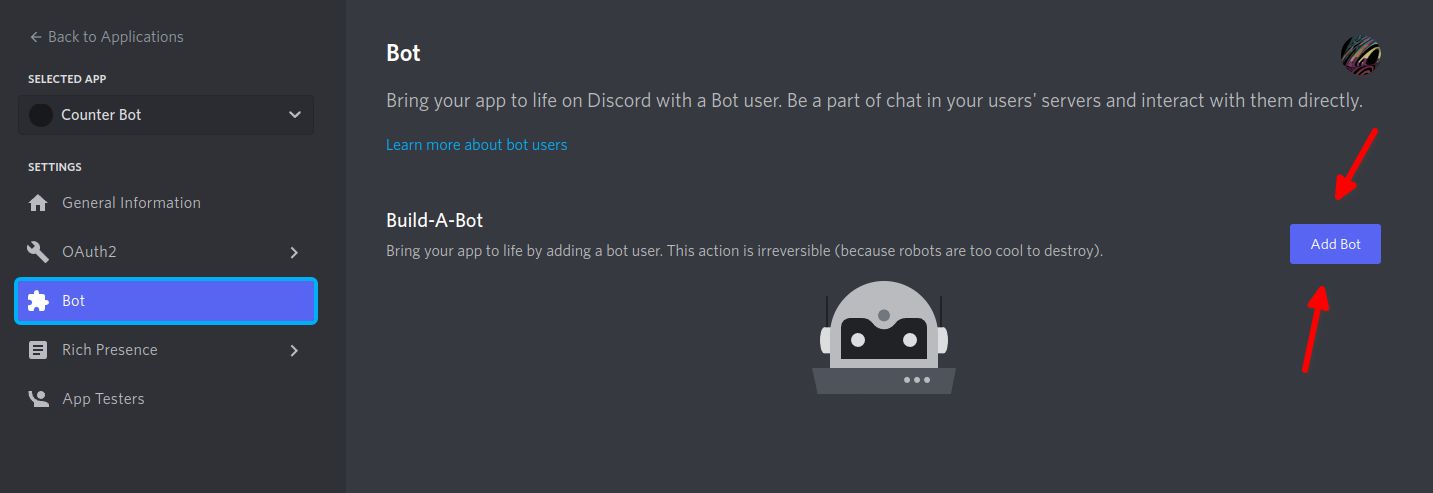
Now, you should see your bot application's page. You can change the details (like the username, profile picture, and description) for your bot here, and you can always come back at any time from the discord developer portal. To make your bot account, click the Bot button in the panel to the left. After that, click the Add Bot button. Congratulations, your bot now has a discord account!

Bot Token
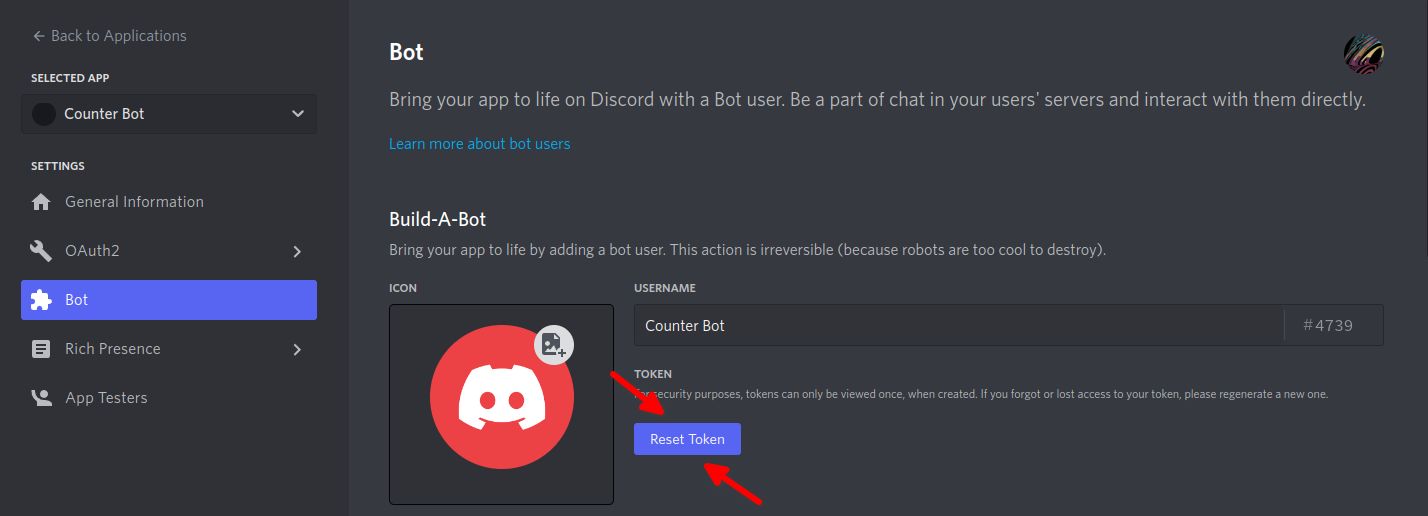
On this page you can access something called the token. The token is basically a username and password all-in-one. If someone gets access to it, they'll have full access to your bot, and can do anything with it that they want. Because of this, make sure that you don't give your bot tokens to anyone unless you really trust them. Luckily, you can reset the token at any time in case it does get leaked.
Now that that's out of the way, let's get the bot token. All you need to do is click the Reset Token button. It's important to note that if you reload the page, you won't be able to access your bot token (you can always reset it again though), so make sure to copy it. Now, let's add it to our bot.
Using Our Bot Token
The first thing we need to do is create a file called .env. Inside this file, add a line that starts with BOT_TOKEN=, then paste your bot token so that it's next to the equals sign. If your bot token was ABCDEFG, for example, you should have a file that looks like:
BOT_TOKEN=ABCDEFG
Once you have that, it's time to actually use the bot token. Open up index.js again, and look at the bottom where it says BOT_TOKEN. You need to replace it with process.env.BOT_TOKEN, so the whole line reads client.login(process.env.BOT_TOKEN);.
process.env contains all of our secrets stored in the .env file. Doing process.env.BOT_TOKEN gets the bot token stored in it. For the example .env file above, doing process.env.BOT_TOKEN would be "ABCDEFG", and so would pass "ABCDEFG" to the client.login function.
Now, let's do a quick check to ensure that our bot is actually set up. Click the Run button (or if you aren't on Cratecode, type node index.js). You should now see a message that says Connected Successfully!. If you don't, or if you receive an error, then there's something wrong with your setup. In the end, your file should look like this.
Adding The Bot to Our Server
At this point, we have a little program that can connect to discord, but it isn't really doing anything. The first issue is that our bot isn't in any servers, so it really can't do anything. Let's fix that!
We'll start by heading back to the Discord Developer Portal. If you closed it, just open it again and click on your bot. In order to invite the bot, we'll generate a link that we can use to add the bot to one of our servers. Keep in mind that you need to have permissions to add a bot to a server. You can ask someone with permission to add the bot to a server or create your own testing server and add the bot there.
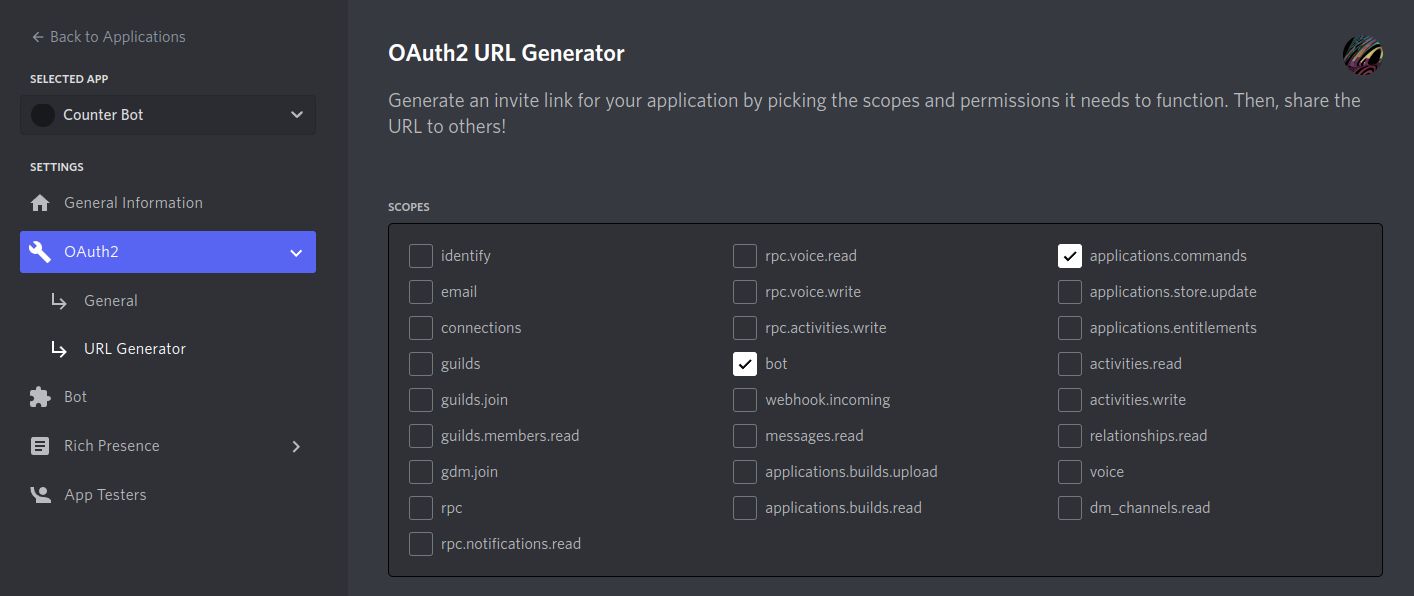
Now, inside the Discord Developer Portal, click on the OAuth2 tab, then click the URL Generator tab under it.
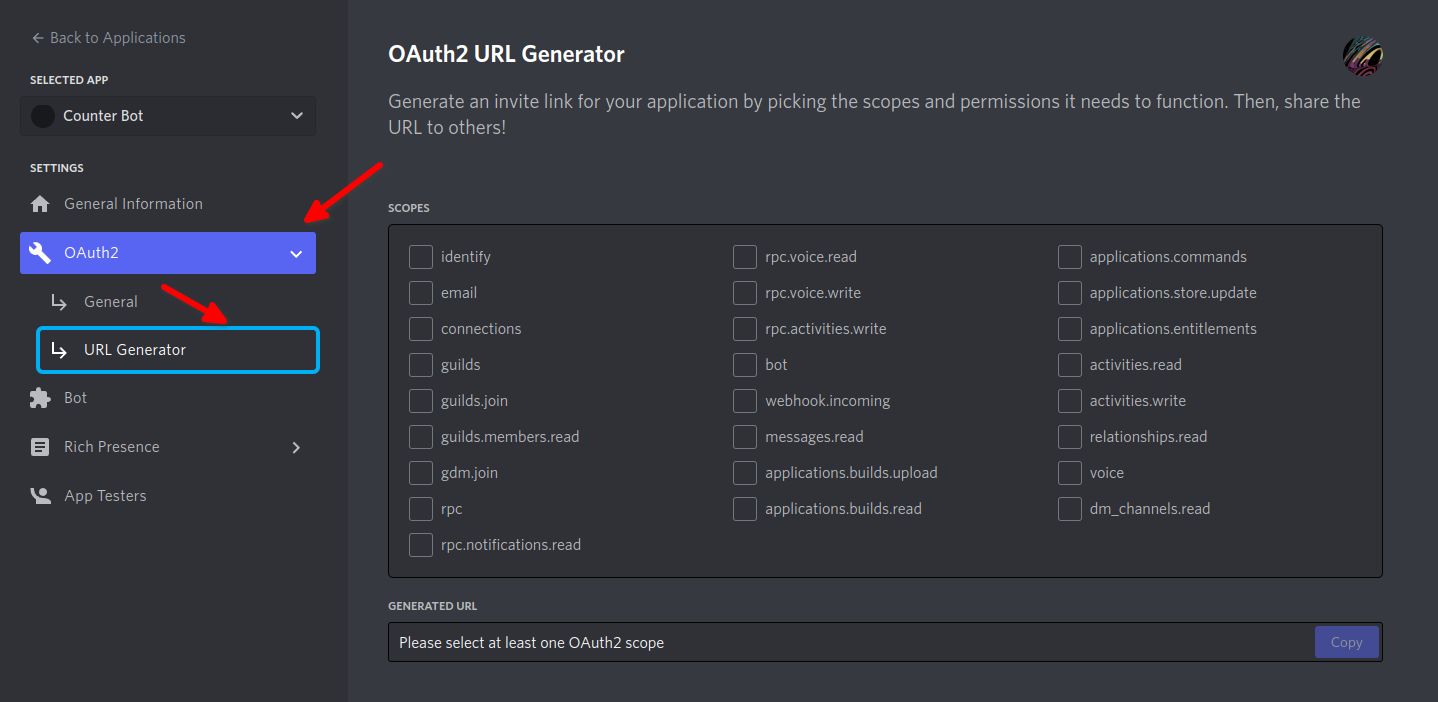
This is a page that we can use to create an invite link for our bot. This link will let us (and other people) invite the bot to join servers.
Now, click the bot and applications.commands checkboxes. The bot checkbox makes the link invite the bot (this page can do more than just generate bot invite links, but we'll ignore that for right now), and applications.commands lets you use slash commands (more on that later).
Now, you should notice a little window pop-up called Bot Permissions. This lets you set what permissions your bot has in your server. You can add anything you think your bot should have, but a good start are the Read Messages/View Channels, Send Messages, Send Messages in Threads, Embed Links, Attach Files, Add Reactions, Connect, and Speak permissions. This lets your bot do similar things to ordinary discord users.
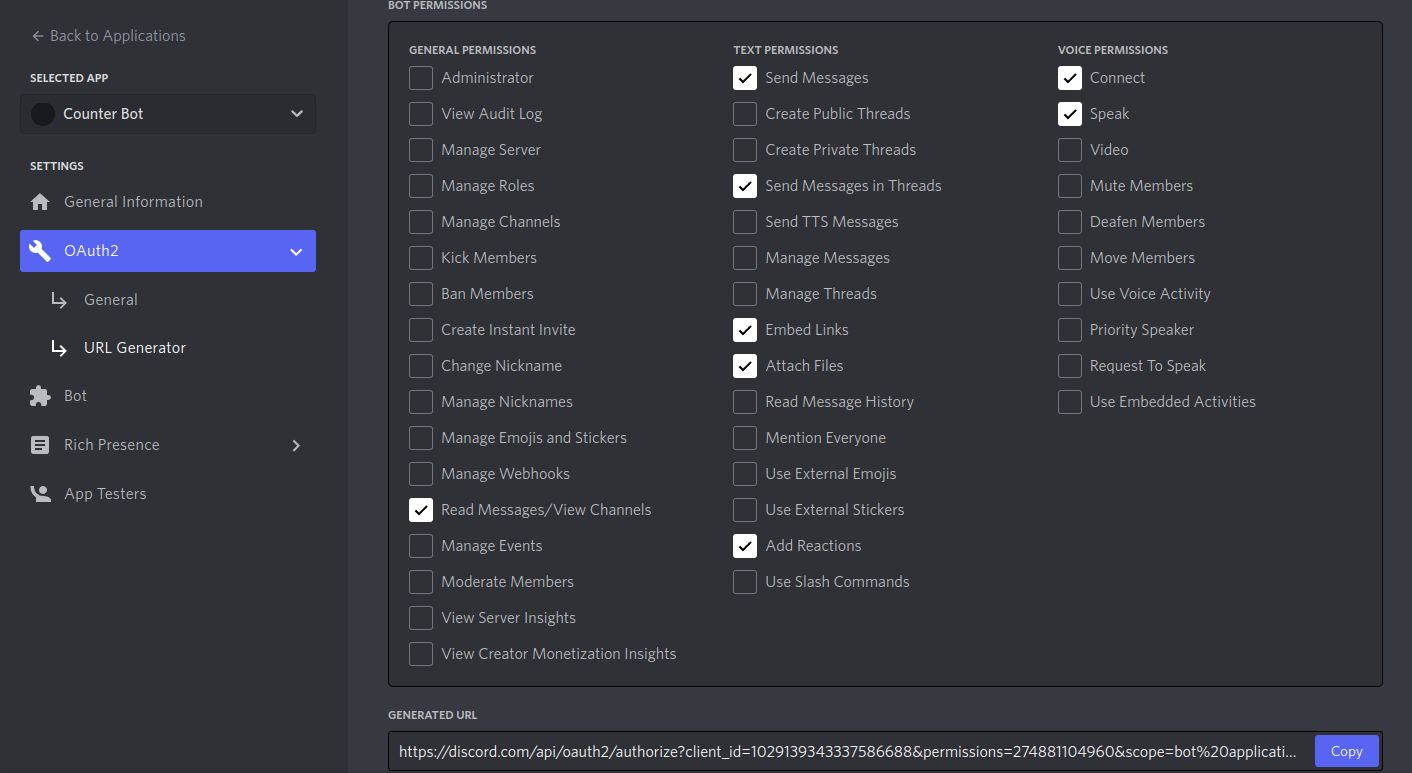
If you want to add permissions later, you can always redo this or change your bot's permissions in your server settings inside of discord.
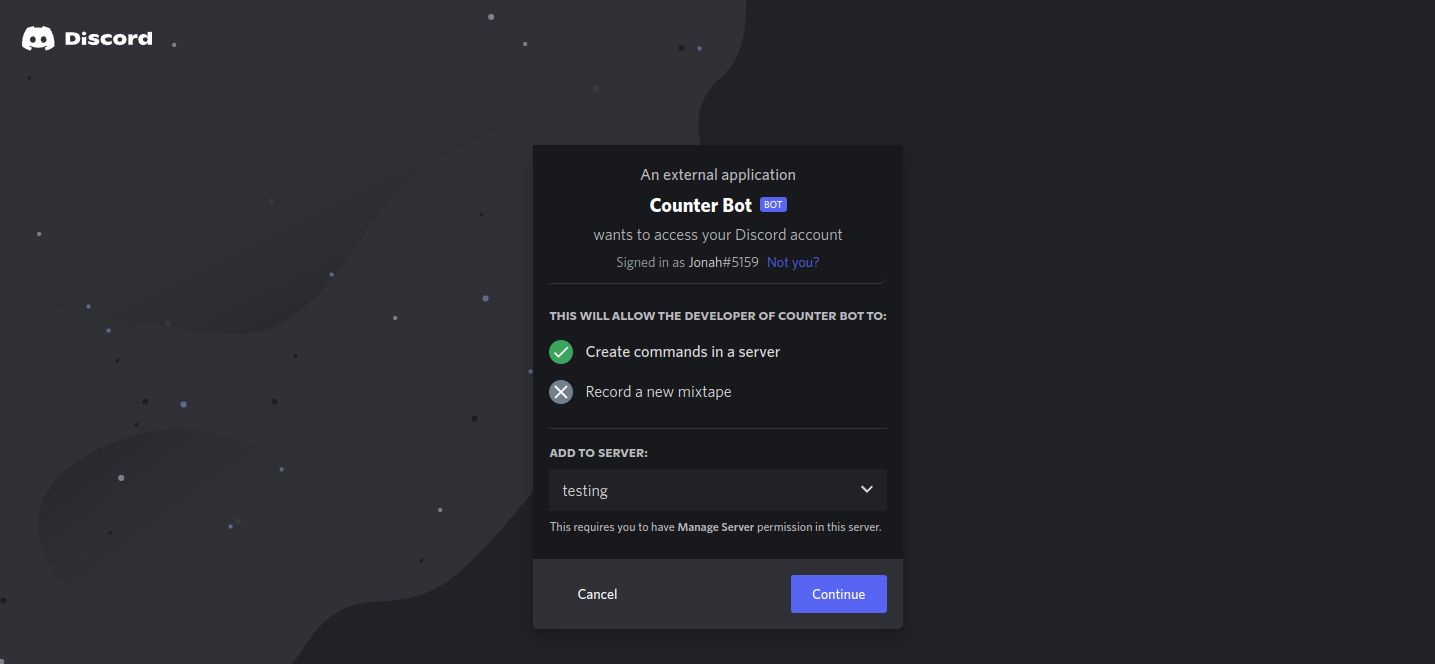
Now, let's invite it! Click the copy button under Generated URL, then paste it into your web browser. Then, select a server, click the continue button, and proceed with the form. You should see your bot appear in your server. If you don't, make sure you went through the form completely and selected the correct server.
Writing Our Bot
Making Our Bot do Something
That was a bit of a process, but we're finally able to make our bot do something. As a little example, let's try sending a message everytime someone in your server sends a message.
The way discord.js works is you can "listen" for messages. That means you can run some code every time someone sends a message in a server that your bot is in. You'll see every single message, in every channel (that your bot has access to) and every server (that your bot is in).
Sending Messages
In order to send a message, we'll first need to get the channel that the message is sent in. When our bot receives a message, discord.js gives our code a Message object. That link goes to the discord.js documentation (which is very helpful when building a bot), and shows that the Message object has a property called channel on it. If our message object is called msg, we can access this channel with msg.channel.
If you click on the channel property in the discord.js documentation, you should see that it has a type of TextBasedChannels. In the documentation, we see that TextBasedChannels can mean DMChannel or GuildTextBasedChannel. This is because our bot can receive messages from guild (discord servers) or by a direct message. For now, we'll focus on GuildTextBasedChannel, but be aware that it can be both.
Clicking on GuildTextBasedChannel, we can see that it can be one of many types of channels. For the time being, we'll ignore them and focus on TextChannel. Now we have something with properties and methods that we can use. What we're looking for is a method called send, which lets us send messages in a channel. You can see that this page tells us how to use send, and includes code examples on how to use it. This is an extremely useful part of discord.js's docs, and I'd recommend you use it.
As we said earlier, if we had a Message called msg, we can get the channel on it with msg.channel. Now, if we want to send a message on that channel, we can use msg.channel.send(). Here's a little example:
msg.channel.send("It works!");So, how do we get msg?
Receiving Messages
In order to send a message every time someone sends a message, we need to receive them. Luckily, discord.js makes this super easy. Inside of index.js, and after client is created, add some code that looks like this:
client.on("messageCreate", (msg) => {
	// Do something here
});
Your code should look something like this (the order of ready and messageCreate doesn't matter).
Now, one thing that we need to know before we continue is that this event will be called when we send a message. If we send a message on every message, our bot will receive someone's message, then send a message, then receive its own message, then send a message, then receive its own message, then send a message, then receive its own message ...
We don't want this. Luckily, there's an easy fix. Using a similar method as in the previous section, we can figure out that (if our Message object is called msg) msg.author.bot will tell us if the person that sent the message is a bot. An easy fix is to just ignore every message sent by a bot (to prevent us from getting into an infinite loop with ourselves and with another bot). If we wanted, we could use msg.author.me to only ignore our bot, but I'm going to use msg.author.bot due to the aforementioned reason.
To use this, we just need to add an if statement to our code:
client.on("messageCreate", (msg) => {
    // Don't handle messages from bots.
    if(msg.author.bot) return;

	// Do something here
});
Sending and Receiving Messages
Now, we have a way to send messages, and a way to receive messages. All we need to do is take our current code, and add msg.channel.send() to it. You can put any text that you'd like into .send(). Here's a little example:
client.on("messageCreate", (msg) => {
    // Don't handle messages from bots.
    if(msg.author.bot) return;

    msg.channel.send("It works!");
});
Now, restart your bot by clicking the Run and see if it works. If it does, then great! You've just made a working discord bot! Otherwise, click here for an example to compare to your code.
In the next lesson, we'll go over how to create commands and make our bot a little more capable. That's all for now though, have fun!
In case you got here with the wrong URL, you can access every discord.js tutorial at https://cratecode.com/unit/ru1w1f268c.
Hey there! Enjoyed the lesson? Consider sharing it with others - it's a huge help and lets us keep making them!